What’s new in Swagger 3?

When people hear Swagger, they think about some rapper or some hot girl in their vicinity. But when an API developer hears about Swagger. It is about the OpenAPISpec. (Funny but not so funny!). Swagger is engraved so much in our lives that even when you hear the word in some songs, I visualize the PetStore API with yaml file on the left hand side and method definitions on the right hand side. In black, green and blue color. That’s the console of https://editor.swagger.io . As an API developer or an API architect, you must be familiar with Swagger and this console. You also know the method definitions and how it is defined. If you entered into the API world in the last decade, you probably are familiar with Swagger 2.0, as after the OpenAPI approved Swagger as the de-facto standard for the API community. Many companies are using the Swagger 2.0. In fact, Mulesoft used to develop APIs only using RAML. But it didn’t want to lag behind and hence adopted Swagger as well in last couple of years.

What is Swagger?

In case you are new to this blog, or wondering what is this Swagger. Let’s do a very brief introduction.

Swagger is a design specification. Swagger allows you to describe the structure of your APIs so that machines can read them. The ability of APIs to describe their own structure is the root of all awesomeness in Swagger. Why is it so great? Well, by reading your API’s structure, we can automatically build beautiful and interactive API documentation. We can also automatically generate client libraries for your API in many languages and explore other possibilities like automated testing. Swagger does this by asking your API to return a YAML or JSON that contains a detailed description of your entire API. This file is essentially a resource listing of your API which adheres to OpenAPI Specification. The specification asks you to include information like:

  • What are all the operations that your API supports?
  • What are your API’s parameters and what does it return?
  • Does your API need some authorization?
  • And even fun things like terms, contact information and license to use the API.
swagger: "2.0"
info:
  title: Sample API
  description: API description in Markdown.
  version: 1.0.0
host: api.example.com
basePath: /v1
schemes:
  - https
paths:
  /users:
    get:
      summary: Returns a list of users.
      description: Optional extended description in Markdown.
      produces:
        - application/json
      responses:
        200:
          description: OK

This is a Sample API where you can see the URI params, the basepaths and the response HTTP codes. We will not go into much details about the Swagger, let’s see what were the major issues with the Swagger 2.0.

Problems in Swagger 2.0

The Swagger was defined keeping in mind as one of the definitions. Just like the RAML was created, Swagger YAML./JSON was also created to put up the API specs at one place. But, after it was donated to the Linux foundation, the R&D teams have been working on making it more generic. As the name was also changed to OpenAPISpec, the then version of Swagger 2.0 was not completely generic. For example, the Security and the securityDefinition tabs were different in the Swagger2.0. But most of the APIs were having either of the parameter. This is no longer a problem in Swagger 3.0. It is more microservices friendly just like the Hibernate framework. Let’s see what’s new in Swagger 3.0 below.

What’s new in Swagger 3.0? What’s OpenAPISpec?

When the version 3.0 of Swagger rolled out, it is being called as OpenAPISpec rather than Swagger 3.0, so we will use OpenAPISpec for referring to the version 3, and Swagger 2.0 for referring to the version 2.0 in the next sections of the blog.

Structural differences between OpenAPI and Swagger 2.0

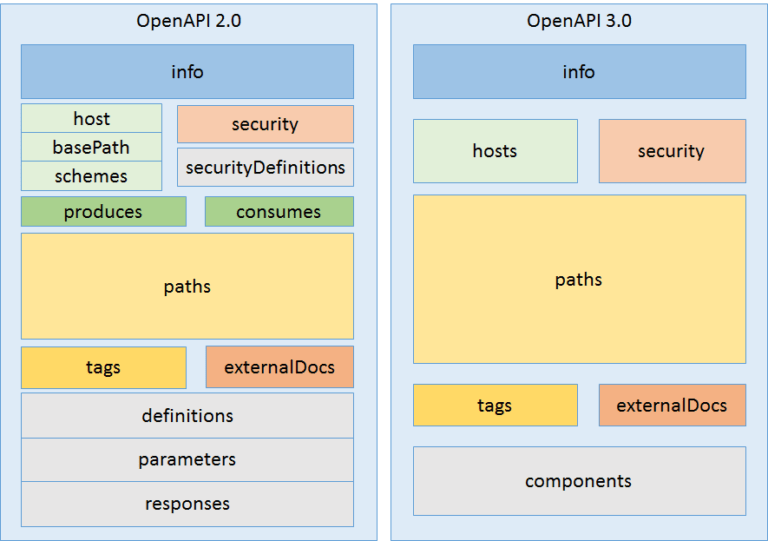
The above diagram clearly depicts the Structural changes in both the versions. The side by side comparison clearly explains the modularity and reusability of the new version of the Swagger. The Swagger has been updated keeping in mind the Microservices. Also, it can be used across different platforms and servers.

Earlier when you were defining the security definitions like Basic auth or OAuth 2.0. It was required to use the security Definitions tab. This was the area where the Auth server URL and other details like grant type were mentioned. Now you can just define them under components if it is needed.

Let’s see one by one about the changes.

  1. Hosts
swagger: "2.0"
host: api.example.com
basePath: /v1
schemes:
  - https
openapi: 3.0.0
servers:
  - url: http://api.example.com/v1
    description: Optional server description, e.g. Main (production) server
  - url: http://staging-api.example.com
    description: Optional server description, e.g. Internal staging server for testing

For the older version, there were predefined keywords such as basePath, which have been removed. But you can still provide them under the super category “servers”.

The advantage in using this approach is that you can define multiple server definitions under the same OpenAPISpec. Isn’t it interesting? It is close to the YAML file that you might be using for your devops build pipeline jobs.

2. Request Body.

swagger: "2.0"
.
.
paths:
  /users/{userId}:
    get:
      summary: Returns a user by ID.
      parameters:
        - in: path
          name: userId
          required: true
          type: integer
          minimum: 1
          description: The ID of the user to return.
      responses:
        200:
          description: A User object.
openapi: 3.0.0
.
paths:
  /users:
    post:
      summary: Creates a user.
      requestBody:
        required: true
        content:
          application/json:
            schema:
              type: object
              properties:
                username:
                  type: string
      responses: 
        '201':
          description: Created

The responses had their own authority by having the tab of their own. On the other hand, the request body was feeling inferior, as they had to share the space with the other parameters and the other definitions. Now, the request Body have been honored as well by giving them a unique keyword “requestBody”. Now, under this tab. The advantage is that you can directly define a JSON object for the request which is quite common. In fact if someone is trying to build a system on top of your API. He will immediately notice that whether your API requires a requestBody (JSON object) or just parameters.

3. Authentication and Security.

swagger: "2.0"
-
-
securityDefinitions:
  BasicAuth:
    type: basic
security:
  - BasicAuth: []
openapi: 3.0.0
-
-
components:
  securitySchemes:
    BasicAuth:
      type: http
      scheme: basic
security:
  - BasicAuth: []

Earlier when you were defining the security definitions like Basic auth or OAuth 2.0. It was required to use the security Definitions tab. This was the area where the Auth server URL and other details like grant type are mentioned. Now you can just define them under components if it is required. This is another perfect example of modularity.

4. OpenID Connect discovery

This is a new addition to the OpenAPISpec. Now you can define the OpenID Connect discovery security mechanism as well in your spec.

openapi: 3.0.0
...
# 1) Define the security scheme type and attributes
components:
  securitySchemes:
    openId:   # <--- Arbitrary name for the security scheme. Used to refer to it from elsewhere.
      type: openIdConnect
      openIdConnectUrl: https://example.com/.well-known/openid-configuration
# 2) Apply security globally to all operations
security:
  - openId:   # <--- Use the same name as specified in securitySchemes
      - pets_read
      - pets_write
      - admin

These were all the changes which are present in the Swagger 3.0 or OpenAPISpec to be specific. Hope you enjoyed reading. Let me know in the comments below if you have started using the OpenAPISpec or still using the Swagger 2.0.

The full OpenAPI 3.0 Specification is available on GitHub: https://github.com/OAI/OpenAPI-Specification/blob/master/versions/3.0.3.md

When to use Stacks?

Hello everyone, hope you are doing good. You are probably a microservices engineer or an engineer building complex applications. So, you might be using the mesh architecture or using complex data structures like Graphs. The data structures like Stacks and Queues might look like primitives or basic to you? So why we want to discuss the Stacks in a world of microservices? and how the Stacks are important in an API world? Let’s find out.

Stacks

Stacks as a Data Structure

Stacks as a data structure is a basic block for any programming language. With the complex operations and technologies like AI and ML, you might think that Stacks are obsolete. But that’s not the case. We are here to talk about the basics of Stacks first. Well, it might be a little bit of revision for you guys.

Stacks work on a principle of LIFO. If you have a very narrow street with one end closed. There cannot be more than two people standing side by side. Suppose Jacob enters first, followed by Ram, and then Serena. What needs to be done if Jacob has to come out of the street? Serena needs to give way to Ram. Followed by Jacob, in order for Jacob to move out. So, without Serena leaving her current place, there is no way that Jacob can come out on the main road.

The purple blocks can only be popped out in the reverse order of their insertion.

This makes the searching in a Stack as O(n), while insertion is retrieval is also O(n) as the worst case. While, it is O(1) for the best case. What if Serena wants to move out of the street? She can just pop out.

Practical usage of Stacks

Since we are interested in the least possible Big O, we would like to use the Stacks when we know that the time complexity is going to be O(1), and it cannot be greater than that. Do you know why? this is because we already have some Data Structures, which are far better than Stacks in terms of searching and retrieval. So, we want to limit the cases to cater to only those requirements where the Stack can fulfill the time complexity of O(1).

This is the very reason for using the Stacks in the Undo operation. Because it will store the previous operation and if needed, can replicate the last settings. It will not follow the order of insertion (unlike in Queues) but will follow the LIFO approach. Remember in the Notepad (not Notepad++), when you do undo or try to do it twice. Do you fail to do so? While you can do it multiple times in Adobe Photoshop or Adobe Lightroom? The answer is simple. The Undo/Redo Stack of the notepad is having only 2 elements. On the other hand, it is much more in terms of the Adobe software.

Can we use Stacks in APIs?

Now comes the most important question. Is it possible to use Stacks in the APIs. Well, Raymond is thinking that he is been using Hashmaps all the time in his APIs, why he will ever use Stacks?

Let’s look closely into Raymond’s APIs. This is happening because he is using stock brokering APIs. And he cannot afford to have the worst-case time complexity in terms of Stacks. So, for his functionalities, he has been using other DSs in order to cater to his current requirements. Raymond is working on a project where he is doing long-term trading and portfolio management of his clients. So, usually, he will know when to pull back a particular stock or share.

Raymond is having a smooth life but during his Sprint planning call. His Scrum master Mr. Raj told him that he wants the capability to do intra-day trading. He is thinking to implement the service class again using the Hashmap. During his coffee break, he discusses this idea of his. Then Mr. Sundar, a senior developer in his team told him that he should use Stacks. The moment Raymond heard Stacks, he started laughing about it, calling his approach primitive. We are dealing with cutting-edge technologies, and the stocks are changing in such a random or complex manner. I think we should be talking about “Stocks” but not “Stacks”.

Stocks application monitoring in real time,

Mr. Sundar smiled at this response and told him that what he is saying about the technology is right. But there is an old saying in India “Jahaan Kaam aave sui, Kaaha kare talwar”. This means that where you need a needle, you cannot use a sword. Then Sundar continued explaining to him the peculiar case about intra-day trading. The scenario where a stock has been purchased, and the client wants to sell the stock at a particular rate, without buying any extra stock. This means that if he purchases a stock at 10 am. He wants to sell it at 11:30 if the stock value is reaching an x% increment. This can be implemented in Stacks rather than using extra space and memory. As the day ends, the stack memory will have either one element or zero elements. Similarly, the time complexity will always be O(1). In this way, you can achieve the time and space complexity of O(1), without utilizing much of a memory.

Raymond was really surprised to see the application of Stacks in such a complex application. But this is how the Stacks have been saving us since their inception. Hope you use the Stacks in your next projects :-).

HTTP Methods supported by REST – HTTP Verbs explained

Just like we have simple methods for your smart device, we have standard methods for a REST API. A huge amount of effort has been simplified when the HTTP methods were defined for specific purposes. For any API which is built, they need to use these methods only. And nobody can use any custom methods to make the API ecosystem more complex. If these are too simple, then why there is a need to discuss about them? we can just have a list and use them in our APIs. Well, the answer is yes. But there are different situations where you might stuck your head in which method to be used? then this blog will come to your rescue.

The HTTP Methods will be used by the client to send a request to the server.

Need of having HTTP Verbs in an API design

Just like we have verbs in English, so that nobody can come up with a verb of his own. and when anyone from any country is speaking in English, the verb he wants to communicate is the same verb as perceived by the user. Ever heard that somebody is saying that “he is singing” when actually the other person is running? or vice versa (well the vice versa may be true if he is running and singing!). But this is the kind of discipline that we follow in our daily lives. Same decision we need to translate when we are making the API design.

When an API built by a developer of Japan has the HTTP method as GET, it means that the API resource is for retrieving something. No other developer in the world will think it as an API to create something? (until you are asking this to a 3 year old kid of yours). Same goes for the other HTTP methods defined by REST.

API Methods analogy to the CRUD operations

Did it strike your mind that the HTTP methods in your API are actually based on the CRUD operations? When they were made initially, it was to satisfy all the CRUD operations. Later on the support for some specific functionalities was added to cater to more specific purposes.

CreatePOST
ReadGET
UpdatePUT
DeleteDELETE
REST vs CRUD in terms of the methods.

The CRUD operations are more readable than the REST operations other than the GET and DELETE operations. The reason being that we need to actually include the method as part of the request unlike the CRUD operation. So, it is having as minimal letters as possible. Let’s understand each method in the next section.

Different methods in a REST API (Explained by use-case)

We will understand the methods by including a practical use case rather than ranting the theory.

Use Case – Jason is having a book store and he wants to automate the process of the database. Whenever a new book arrives, he is manually creating an object in the database. And he runs a query whenever he wants to retrieve information about any book. In this case, he has decided to follow an API to do these tasks. So that in future, he can automate these tasks without much of a manual intervention.

POST – This method is used when a user wants to create something. For example, Jason will use this method whenever he wants to make an entry of a new book. So, he will simply use a POST method, give some parameters like the book name, author name, paperback, publisher etc & create a new entry in the database.

GET – This method is very literal and not require much information. But still we need to understand how powerful get method is. When Jason wants to retrieve information about any book he will use the GET method, which is the most common use case. But there are other use cases of a GET method that I will discuss in detail in a different blogpost.

DELETE – This method will be used to delete an entity, that entity can be a singular entity or can be a JSON object. Usually in the API world, it is an object. For example, information about a book needs to be deleted when it is no longer relevant in the book store.

PUT – When there are few attributes of an entity that needs to be modified or updated, we use the PUT method. This method will retain the object as a whole, but will update the requested attributes.

PATCH – PATCH method is used for updation of a fraction of the whole object. For example you have an e-book named “Wings of Birds” and the publisher is “Ostrich Communications”. Suppose the publisher has re-branded itself as “Ostrich Media”. The other attributes like the book name, book published date will remain same, but the publisher will change, so you will use the PATCH method instead of a PUT method. But, this method is optional so whether you should use a PATCH method or not? Find out here https://apigraphy.home.blog/2020/04/03/put-vs-patch-difference/

OPTIONS – An options method is used to indicate the requester about what all methods he can actually use for a particular URL. For instance, a /books with OPTIONS method might return like this.

curl -X OPTIONS http://example.org -i

The response then contains an Allow header with the allowed methods:

HTTP/1.1 204 No Content
Allow: OPTIONS, GET, HEAD, POST
Cache-Control: max-age=604800
Date: Thu, 13 Oct 2016 11:45:00 GMT
Expires: Thu, 20 Oct 2016 11:45:00 GMT
Server: EOS (lax004/2813)
x-ec-custom-error: 1

The another significance of using an OPTIONS method is in a pre flight request for a CORS request. This is because the Pre-flight request will tell the requester on what is allowed to be sent. For example “Access-Control-Allowed-Headers” will send a list of headers allowed. In literal meaning which translates as ” the options of headers that can be used for this request”, hence the name of the HTTP verb.

HEAD – This method is the least used method among all. The return is similar to that of a GET method, but it necessarily doesn’t contain any body. The metainformation contained in the HTTP headers in response to a HEAD request SHOULD be identical to the information sent in response to a GET request. This method can be used for obtaining metainformation about the entity implied by the request without transferring the entity-body itself. This method is often used for testing hypertext links for validity, accessibility, and recent modification.

I wish this was helpful in making you decide about the HTTP method to be used in your API design. Feel free to post any queries below or any topic on which you would like to have a blog to be published.

Types of APIs

What is the first thought that comes to your mind when you are designing APIs? Is it the http method to be used? Or the kind of authorization to be used? Or you are thinking about keeping things in the query param or the URI path? I think before we move into these things, there is something which is much more important than these factors. And in reality, if you make it right, that will be easy for you to decide on the factors we discussed above. That aspect is the type of API. We are talking about the REST APIs here, but when we are designing the API Specs, we should consider the type of APIs. The categorization of the API will accelerate not only the design but also the management of the API in a better way.

Classification of APIs

Let’s move on to classifying the APIs. These are the major classification of any APIs.

  • Open APIs: Also known as Public API, there are no restrictions to access these types of APIs because they are publicly available.
  • Partner APIs: A developer needs specific rights or licenses in order to access this type of API because they are not available to the public. Moreover, these APIs are specifically designed for trusted partners to facilitate businesses. For example, a telecom recharge API to be consumed by a payment gateway.
  • Internal APIs: Also known as Private APIs, only internal systems expose this type of API. These are usually designed for internal use within a company. The company uses this type of API among the different internal teams to be able to improve its products and services.
  • Composite APIs: This type of API combines different data and service APIs. It is a sequence of tasks that run synchronously as a result of the execution, and not at the request of a task. Its main uses are to speed up the process of execution and improve the performance of the listeners in the web interfaces.

Why we should classify the APIs?

We have seen above that the classification should be the first step while designing any API. But what we should also learn is why we are doing this? Here are some pointers that explains why it becomes important.

  1. The security implementation on the APIs can be designed based on the type of the APIs,
  2. The API classification can be the basis of the business group or the organization structure. Simply because you don’t want to expose everything to your partners right? So you keep the internal APIs to a separate organization and the partner APIs in a separate org.
  3. The endpoint and the resource naming can be an area where you would like to see the consumers of the APIs. For example, for a public or an open API, you want to restrict the information outflow, and you want to make sure that you are not exposing something that can be vulnerable. On the other hand, you want the internal APIs to be as user-friendly and they will mirror the company nomenclature rather than mapping to a different terminology.
  4. The API classification is actually the basis of the authorization level of any API. If we talk about OAuth, the client credentials is never meant to be used with the open APIs.
  5. The data transformation which is happening in your API proxy layer is another area where you would want to think about the classification of the APIs.

I hope that we have got a rough idea on what is the most important factor to be discussed before we design any API. Feel free to post questions/discussions below, and I will be happy to participate.

PUT vs PATCH difference

Finally Jackson has started building his APIs, and also few of them are in Production. After some time, his scrum master comes up with a new requirement of one of his API. Let’s say he build an API for an airport to get information about all the flights originating from that airport. He is sending a JSON response to the frontend folks which is a simple JSON with some 5-6 fields on it, such as the airline provider, it’s bay number, the carrier capacity, the airplane manufacturer, the model number etc. This API is exceptionally running well in real life with no issues at all, and Jackson is chilling at his home office just watching the transactions (with some popcorns? or just some coffee). All is going when until he is told that there may be a change in few parameters of the airplane, like the Bay area is most likely to change. How do he incorporate this? Do he need a new API for this? Let’s find out.

Existing APIs

Let’s quickly take a look at the existing APIs that he has. So he has a Create request to put the data of a new airplane. He has a retrieval request to know about any plane with the unique id and some filters. There are just POST method and GET method for the time being. This is because the manager had no plans of changing the Bay area, so there might be no need for an update for possibly few months.

POST/GET
https://terminalhyatt/carriers/flights/v1/(flightNumber)

Possible solutions

Jackson decided to go with the PUT method as it is an update which is required. And PUT method will definitely serve the business requirements and also not technically incorrect to use in this case. And he was very happy until his architect told him to check for the PATCH method before using the POST. This made him concerned and his happiness meter was soon on the lower side. As it was a Friday and he was very happy on implementing the POST method on his APIs. Now he is sitting and looking for the PATCH method and it’s advantages. After few research, he had a discussion with the business team. And the business team confirmed that at least for the next 2 years, the only parameter which will possibly change is the Bay area, and there shall be no change in the other parameters. This information was enough for Jackson to go with the PATCH method instead of POST. Why only PATCH and why can’t POST? and How they are different?

PUT/PATCH
https://terminalhyatt/carriers/flights/v1/(flightNumber)

Differences between the PUT and PATCH method

Though PUT method is being used since ages to update the requests and is very successful in its operation also. But the PUT method is idempotent and requires the whole request body to be give, even if there is one change. There might be variations by giving the mandatory and the optional fields. But if there are multiple parameters, you simply can’t keep flipping the mandatory ones as and when new requirements comes in. That’s when the PATCH method comes handy. This method only requires a fraction of fields ranging from one to all. You might end up updating just one parameter, with no limitation on the semantics matching with the application. On the other hand, the semantics has to be matched with that in the application. So, you not only use less bandwidth, but you also makes the life of the API developers easier. As they can simply put the field which needs to be changed and submit the PATCH request. (Please note that the example quoted above talks about the change of one parameter, but PATCH request can be used if the fraction of the parameters are being changed, and is not limited to just one.)

The difference between a PUT and PATCH method is similar to what we use in literal English. When you want to paint the walls of your room, and you want to change the color of the paint, you will PUT the paint on the walls. When you want to paint one of the four walls, in that case, you will either PUT the paint or just PATCHfully paint that wall. On the other hand, if there is a damage in a fraction of one of the walls, and you want to paint it. You will apply a PATCH of paint to make it even.

Mrin

There are other scenarios also, if the body that needs to be changed is usually bigger than the existing one, you may go with the POST method as well. But let’s not get confused here. 99% of the times, the body to be updated will be either equal to the existing one (PUT method preferred) or will be a fraction of the existing one (PATCH method preferred).

I hope that from next time onwards you won’t find yourself in a situation where you will have to worry about the PUT method or the PATCH method.

Error error everywhere, which error code shall I use?

When we talk about any web service design or API Design, we definitely care about the functionality and the positive flows. It’s important for an application to cater to the business requirements. But it’s equally important for it, to behave in a close to certain and standard way, in terms of negative and erroneous situations. The error handling becomes more important when you have a wide base of consumers. Suppose an API developer named Jackson (from Hong Kong) is building an application which will be consumed by the developers of Banks across various regions. The banks may include NAB from Australia, DBS from Singapore, ICICI Bank from India, JP Morgan from the USA and so on. Now there are two major notions that come into the picture. Firstly, the error handling should be done in such a way that it is understood by each and every consumer. Secondly, Jackson is not supposed to expose the internal details of the application, because it may leave his application in a vulnerable condition. To handle the second condition, HTTP has already defined standard HTTP Status Codes for various conditions. But Jackson is confused, as he has to adhere to the second condition as well. His job was easy if he was asked to map all the Backend related error description (error code and the error message) to the application. And create as many status code entries as there are in the Backend. But it will affect the user-friendliness of the application. On the other hand, the error message will display the internal details of the application. For example, if the Database connectivity was lost, the error message from the Backend will clearly say this in the error message. Now, if Jackson exposes this error message to the actual application consumer. After using the application for a long time, the consumer knows which error is most frequent, and how to put the system down. So we definitely don’t want the external parties to know about this kind of error description. On the other hand, if Jackson is giving a bunch of error status codes including the common and the rarely used ones. It’s not only going to increase the complexity of the application but the consumers also have to dig their heads before they can smoothly use the application. The most adverse effect will be on the end user, a common man, who is not a developer but relates to the business team. It will be so hectic for them to get a cheat sheet of error codes and mugging up 413, 415, 422 and so on. So in what way Jackson should design his application? What you can think of? Proceed to the next section to find out…

To address all the situations that may increase the design complexity and might be vulnerable, we can reduce the number of the status codes and the error description that we are going to provide to the customer. Below is the list of some error codes which are not only good to have. But you can build an entire application based on just these few error codes. Trust me, you don’t need a huge number of error codes to build your application. There are various applications which are being used worldwide and are having merely 5 status codes, including the positive ones. The detailed description of the mandatory error status codes is given at the end. But few sets of “must have” error codes are given below.

Approach one (For Software Engineers who don’t want to make their lives miserable, just kidding)

  • 400 – Bad Request
  • 401 – Unauthorized
  • 500 – Server Error

Approach two (For Software Engineers who don’t want to make other’s lives miserable)

  • 400 – Bad Request
  • 401 – Unauthorized
  • 403 – Forbidden
  • 404 – Resource Not Found
  • 500 – Server Error

Approach three

  • 400 – Bad Request
  • 401 – Unauthorized
  • 403 – Forbidden
  • 404 – Resource Not Found
  • 409 – Conflict
  • 500 – Server Error
  • 504 – Gateway Timeout, when the server doesn’t receive the timely response from the upstream.

Your job can be done in the third set above, but I would like to mention two more useful and common error codes. You can club them in the second or third approach above.

  • 429 – Too Many Requests. (Optional, you can happily throw 500 in such cases)
  • 503 – Service Unavailable (Optional, again, you shouldn’t worry if you are not throwing the 503 explicitly, as the client can’t do anything but just wait to hit after some time.).

The first one is the most confined approach and contains the boss of all the mandatory error codes. It can be used for some internal, or lightweight applications, or where the simplicity is the key concern.

The second approach is what I recommend most of the developers/architects should follow for publicly exposed applications. And is being used globally for various applications. This is because the error codes present in this category are the mandatory ones, and you simply don’t need any other error code if you have these. But, you can also have a combination of error codes from the ones mentioned above and build your application.

The third approach is useful when you have complex requests and the user is mostly an application rather than a real human. Because, it is beneficial to give more specific error code in some cases, and you can’t settle down with the second approach. Jackson is glad now and is using the second approach for his application. The consumers are happily consuming his application without mugging up the status codes sheet. Having said that, I would again recommend sticking to approach two. Most importantly, these are not the hard and fast rules that have to be followed, but it’s more like a guidebook. If you are thinking to have only these error codes in your application, you should not be concerned. You can have some specific error on top of it, if it’s really required for your application like 415 – Unsupported Media type, etc. This might be required when your application is dealing with various media types. But for Jackson who just has a couple of Media Types in his application, throwing 400 will do the same job.

HTTP Status CodeBrief about the errorError Definitions as per the HTTP standard
400Bad Request – When something is missing or not allowed in the request. Header, query param, body or path.The request could not be understood by the server due to malformed syntax. The client SHOULD NOT repeat the request without modifications.
401Unauthorized When someone passes wrong auth credentials or expired credentials. It’s unauthenticated to be precise.Status code indicates that the request has not been applied because it lacks valid authentication credentials for the target resource. The server generating a 401 response MUST send a WWW- Authenticate header field (Section 4.1) containing at least one challenge applicable to the target resource.
403Forbidden – When someone has the valid auth credentials but doesn’t have access to a particular business functionality/API resource. Unauthorized to access.The server understood the request but is refusing to fulfill it. Authorization will not help and the request SHOULD NOT be repeated. If the request method was not HEAD and the server wishes to make public why the request has not been fulfilled, it SHOULD describe the reason for the refusal in the entity.
404Not found – When the request is unable to find the requested response (parameter/body) in the backend. For eg., querying something which is not available in the database.The server has not found anything matching the Request-URI. No indication is given of whether the condition is temporary or permanent.
500Server Error – When the server is unable to receive or process the request. Error in any component like DB, Backend, etc.The server encountered an unexpected condition which prevented it from fulfilling the request.